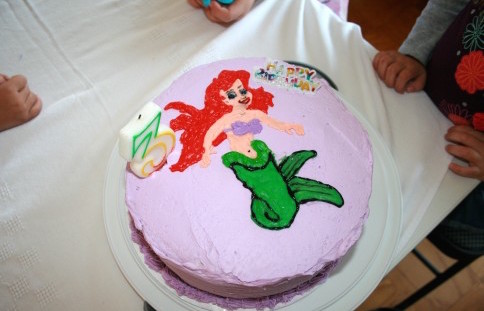
Happy Birthday Penelope (part two)
Earlier I shared the recipe for the Swiss buttercream I used on Penelope’s birthday cake. In that post I promised to share with you how I got Ariel on her cake. Sometimes it seems like everyone I know was blessed with a crazy amount of talent and my talent is faking talent. I have such a limited amount of artistic ability when it comes to pen and paper application, and that talent becomes even more limited when working with a more unreliable medium like buttercream. This is where the faking talent comes in. I do not have one of those fancy schmancy cake projectors (although if some one wanted to buy me one I would totally take it. I would even bake & decorate an awesome cake for you) so I had to come up with a solution that would work with what I already had in my house.
I wish I would have had some foresight and had taken pictures to document the process of getting the image from paper to cake. Unfortunately I was decorating Penelope’s take at 10 p.m. the night before her party and all I wanted to do was get it to look half way decent, so I hope you have a creative imagination and will be able to follow along with my directions (if anything is confusing please leave me a comment or email me and I will try by best to explain things more clearly).
THE PROCESS:
the technical stuff-
1. I went to Google to find an Ariel image I liked. I then clicked on the image to save it to my desktop.
2. Open the image and resize it so it will properly fit on the cake, I also flipped the image horizontally. Then saved the image.
3. Print
4. Place a piece of parchment paper over the flipped image then trace using a Sharpie.
the messy stuff-
1. Have your buttercream ready to go in the colors of your choosing.
2. Flip over the parchment paper so the Sharpie is on the back side.
3. Using a small tip begin to trace over the Sharpie. If you are starting on the tail trace over the outline of the tail in green buttercream. Begin to fill in the tail, using a toothpick to help smoothly distribute the buttercream.
4. Do this with the rest of the Ariel design.
5. Place in freezer for 30 min for the buttercream to become stiff.
6. Very carefully peel the frozen buttercream away from the parchment paper and place on top of decorate cake.
7. Add facial features and any touch ups that you need.
8. Bask in the glory of your faked artistic talent 🙂
The colors I used for Ariel:
Americolor Food Gel
Skin tone – Copper
Hair- Super Red
Tail- Leaf Green
Shells- Royal Purple
I used a little black to outline and give definition to the tail.
Do you have any cake decorating tips for me? Please share in the comments below!
How do you decorate a cake? Do you freehand your own designs or do you leave your cake plain?


So neat! I never would have thought to use parchment paper and freeze it before transferring. Much cleaner and more precise than trying to sketch free-hand with frosting!
Don’t you believe it when Jamie says she had no talent. She has MANY and decorating cakes is one of them! check out the Wilton Cake Decorating website for lots of help.
Very creative. Good suggestions too!!
Way back when I use to make a cake of their choice. They always turned out cute but it took me an entire day sometimes!! The most challenging one was the monster truck cake. Never tried that one twice.
Don’t sell yourself short – you have far more talent then you’re giving yourself credit for. Your Ariel cake for your daughter is a heckuva a lot better than the Gingerbread cookies I outlined with Royal Icing last weekend. When I remembered to put reading glasses on – they got better. *smile*
You can also use this stuff called piping gel for transfers to cakes. I took a cake decorating class.
Basically you put the image on the top of wax paper with a sharpie. Flip the wax paper over and then using a bag and thin tip, trace with the piping gel over the sharpie. When done, center over top of cake and then press down lightly. The piping gel will stick to the frosted cake and is clear. Just fill in with frosting and you’re done. also go to http://www.wilton.com . THey have good ideas too.